Wednesday, April 18, 2012

Why & How WebDriver (Selenium) coding?


Why & How WebDriver automation?

The limitations of Selenium IDE are:
1) Selenium IDE uses only HTML language.
2) Conditional or branching statements execution like using of if, select statements is not possible.
3) Looping statements using is not possible directly in Selenium HTML language in ide.
4) Reading from external files like .txt, .xls is not possible.
5) Reading from the external databases is not possible with ide.
6) Exceptional handling is not there.
7) A neat formatted Reporting is not possible with IDE.


Selenium IDE is very useful in learning stage of Selenium as it has feature of record actions. we can export recorded test case to any of these formats.
Selenium IDE exporting formats
Download latest Selenium-server jar from here.
How to start with WebDriver ? (WebDriver + Java)
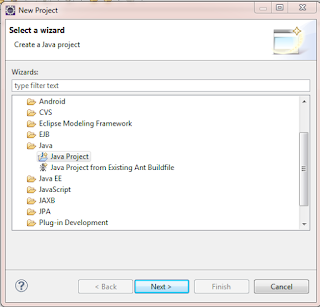
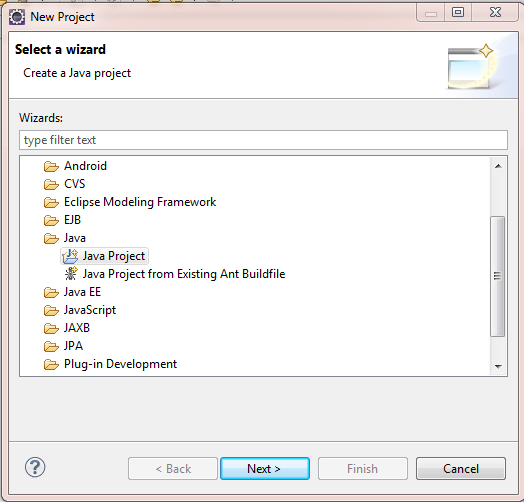
Create a Java project in eclipse
Create new Project
Select Java 
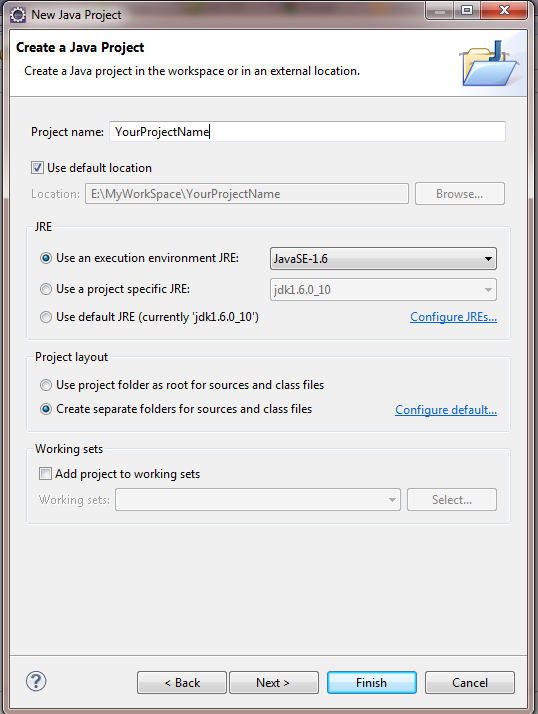
Give the Project name
Import downloaded selenium jar file in your java project.
Importing selenium jar in your project
To get above screen right click on your project
Build path > Configure Build path > Libraries (tab) > Add external Jar

Now entire setup is ready in your machine to write Selenium programs, Start writing your test cases using WebDriver classes & methods. WebDriver Java Document available here.

Example program : 

package org.openqa.selenium.example;

import org.openqa.selenium.By;
import org.openqa.selenium.WebDriver;
import org.openqa.selenium.WebElement;
import org.openqa.selenium.firefox.FirefoxDriver;
import org.openqa.selenium.support.ui.ExpectedCondition;
import org.openqa.selenium.support.ui.WebDriverWait;

public class Selenium2Example  {
    public static void main(String[] args) {
        // Create a new instance of the Firefox driver
        // Notice that the remainder of the code relies on the interface, 
        // not the implementation.
        WebDriver driver = new FirefoxDriver();

        // And now use this to visit Google
        driver.get("http://www.google.com");
        // Alternatively the same thing can be done like this
        // driver.navigate().to("http://www.google.com");

        // Find the text input element by its name
        WebElement element = driver.findElement(By.name("q"));

        // Enter something to search for
        element.sendKeys("Cheese!");

        // Now submit the form. WebDriver will find the form for us from the element
        element.submit();

        // Check the title of the page
        System.out.println("Page title is: " + driver.getTitle());
        
        // Google's search is rendered dynamically with JavaScript.
        // Wait for the page to load, timeout after 10 seconds
        (new WebDriverWait(driver, 10)).until(new ExpectedCondition<Boolean>() {
            public Boolean apply(WebDriver d) {
                return d.getTitle().toLowerCase().startsWith("cheese!");
            }
        });

        // Should see: "cheese! - Google Search"
        System.out.println("Page title is: " + driver.getTitle());
        
        //Close the browser
        driver.quit();
    }
}

Happy coding... :)


Selenium.....


runs in many browsers and operating systems
can be controlled by many programming languages and testing frameworks.


What is Selenium?
Selenium automates browsers. That's it. What you do with that power is entirely up to you. Primarily it is for automating web applications for testing purposes, but is certainly not limited to just that. Boring web-based administration tasks can (and should!) also be automated as well.


Selenium has the support of some of the largest browser vendors who have taken (or are taking) steps to make Selenium a native part of their browser. It is also the core technology in countless other browser automation tools, APIs and frameworks.
If you want to


  • create robust, browser-based regression automation
  • scale and distribute scripts across many environments

Then you want to use Selenium WebDriver; a collection of language specific bindings to drive a browser -- the way it is meant to be driven.
Selenium WebDriver is the successor of Selenium Remote Control which has been officially deprecated.

Introducing WebDriver
The primary new feature in Selenium 2.0 is the integration of the WebDriver API. WebDriver is designed to providing an simpler, more concise programming interface along with addressing some limitations in the Selenium-RC API. Selenium-WebDriver was developed to better support dynamic web pages where elements of a page may change without the page itself being reloaded. WebDriver’s goal is to supply a well-designed object-oriented API that provides improved support for modern advanced web-app testing problems.

How Does WebDriver ‘Drive’ the Browser Compared to Selenium-RC?
Selenium-WebDriver makes direct calls to the browser using each browser’s native support for automation. How these direct calls are made, and the features they support depends on the browser you are using. Information on each ‘browser driver’ is provided later in this chapter.
For those familiar with Selenium-RC, this is quite different from what you are used to. Selenium-RC worked the same way for each supported browser. It ‘injected’ javascript functions into the browser when the browser was loaded and then used its javascript to drive the AUT within the browser. WebDriver does not use this technique. Again, it drives the browser directly using the browser’s built in support for automation.


Tuesday, April 17, 2012

AdvancedUserInteractions API


The Advanced User Interactions API is a new, more comprehensive API for describing actions a user can perform on a web page. This includes actions such as drag and drop or clicking multiple elements while holding down the Control key.

How to :
In order to generate a sequence of actions, use the Actions generator to build it.


Actions builder = new Actions(driver);

   builder.keyDown(Keys.CONTROL)
       .click(someElement)
       .click(someOtherElement)
       .keyUp(Keys.CONTROL);
Then get the action:
      Action selectMultiple = builder.build();
And execute it:
   selectMultiple.perform();


Actions

Keyboard

The Keyboard interface has three methods:
  • void sendKeys(CharSequence... keysToSend) - Similar to the existing sendKeys(...) method.
  • void pressKey(Keys keyToPress) - Sends a key press only, without releasing it. Should only be implemented for modifier keys (Control, Alt and Shift).
  • void releaseKey(Keys keyToRelease) - Releases a modifier key.
It is the implementation's responsibility to store the state of modifier keys between calls. The element which will receive those events is the active element.

Mouse

The Mouse interface includes the following methods (This interface will change soon):
  • void click(WebElement onElement) - Similar to the existing click() method.
  • void doubleClick(WebElement onElement) - Double-clicks an element.
  • void mouseDown(WebElement onElement) - Holds down the left mouse button on an element.
  • Action selectMultiple = builder.build();
  • void mouseUp(WebElement onElement) - Releases the mouse button on an element.
  • void mouseMove(WebElement toElement) - Move (from the current location) to another element.
  • void mouseMove(WebElement toElement, long xOffset, long yOffset) - Move (from the current location) to new coordinates: (X coordinates of toElement + xOffset, Y coordinates of toElement + yOffset).
  • void contextClick(WebElement onElement) - Performs a context-click (right click) on an element.

Some Examples :

Mouse over Action : 
           new Actions(driver).moveToElement(element).perform();
Drag and Drop :
           new Actions(driver).dragAndDrop(dragable, dropAt).perform();

will update some more useful Actions here in future.


Friday, April 13, 2012

Get complete exception trace as a String

In some cases we want to write the complete exception stackTrace to a file, in that case use below method which will take Throwable object as a input and returns complete stackTrace as a String.

By using below method you can get complete exception stack trace as a String.

public static String stackTraceToString(Throwable e) 
{
  String retValue = null;
  StringWriter sw = null;
  PrintWriter pw = null;
  try {
                  sw = new StringWriter();
                  pw = new PrintWriter(sw);
                  e.printStackTrace(pw);
                retValue = sw.toString();
  } 
               finally 
               {
           try {
                       if(pw != null) { pw.close();}
                       if(sw != null) { sw.close();}
               } 
                       catch (IOException ignore) {
    ignore.printStackTrace();
             }
      }
 return retValue+" \n ";
}

MouseOver method in WebDriver

Use below method for mouseover action in WebDriver

public void mouseOver(WebDriver driver,WebElement element) throws Exception
{
new Actions(driver).moveToElement(element).perform();
}


Thursday, April 12, 2012

How to switch control to pop-up window ?


Switching control to popup


If you want to do any operations in pop-up window you need to switch the control to pop-up window then do all your operations in that and finally close the pop-up window and again select the default (main ) window.


here is WebDriver logic to select Pop-up window


1 . Pop-up window has name/id


     driver.switchTo().window("<window name>");


2. Pop-up window doesn't have name / you don't want to hard code the window name then go for below logic.

Method-1


  • before opening pop-up get the main window handle.
             String mainWindowHandle=driver.getWindowHandle();
  • open the pop-up (click on element which causes open a new window)
             webElement.click();
  • try to get all available open window handles with below command. (the below command returns all window handles as Set)
            Set s = driver.getWindowHandles();
  • from that above set try get newly opened window and switch the control to that (pop-up window handle), as we already know the mainWindowHandle.
          Set s = driver.getWindowHandles();
Iterator ite = s.iterator();
while(ite.hasNext())
            {
String popupHandle=ite.next().toString();
if(!popupHandle.contains(mainWindowHandle))
{
driver.switchTo().window(popupHandle);
}
}
  • Now control is in pop-up window, do all your operations in pop-up and close the pop-up window.
  • Select the default window again.
                 driver.switchTo().window( mainWindowHandle );


Method-2

// get all the window handles before the popup window appears
 Set beforePopup = driver.getWindowHandles();
     
// click the link which creates the popup window
driver.findElement(by).click();
  
// get all the window handles after the popup window appears
Set afterPopup = driver.getWindowHandles();
     
// remove all the handles from before the popup window appears
afterPopup.removeAll(beforePopup);

// there should be only one window handle left
if(afterPopup.size() == 1) {
          driver.switchTo().window((String)afterPopup.toArray()[0]);
 }


Thursday, February 9, 2012

Using Selenium 1.0 features in WebDriver

You can use your favorite features in Selenium RC in WEbDriver as well by using WebDriverBackedSelenium.


WebDriver driver= new FirefoxDriver();
Selenium selenium = new WebDriverBackedSelenium(driver, baseURL);
driver.get(baseURL); 
selenium.windowMaximize(); //selenium-rc method


 Happy coding guys